
Tracking and Billing Time
This guide walks you through time tracking in Sodium — switching it on, setting hourly rates for your team, logging time against clients and tasks, letting timers run themselves from task progress, and turning unbilled hours into billing line items.
Before you start
Time tracking is switched off by default, and until you turn it on there is no time tracking UI anywhere in the app. Enabling it is one toggle, but it's worth deciding two things with your team first:
- Is time billable by default? If most of the time you record ends up on an invoice, have new entries start as billable. If you mainly track time to understand where the hours go, leave it off and mark billable time by hand.
- Must every entry link to a client or task? By default entries can be freeform ("CPD webinar", "team meeting"). If you want every recorded minute attributable, you can make the client or task link on every entry mandatory.
Nothing is set in stone — both options can be changed later without affecting existing entries.
1Enable time tracking
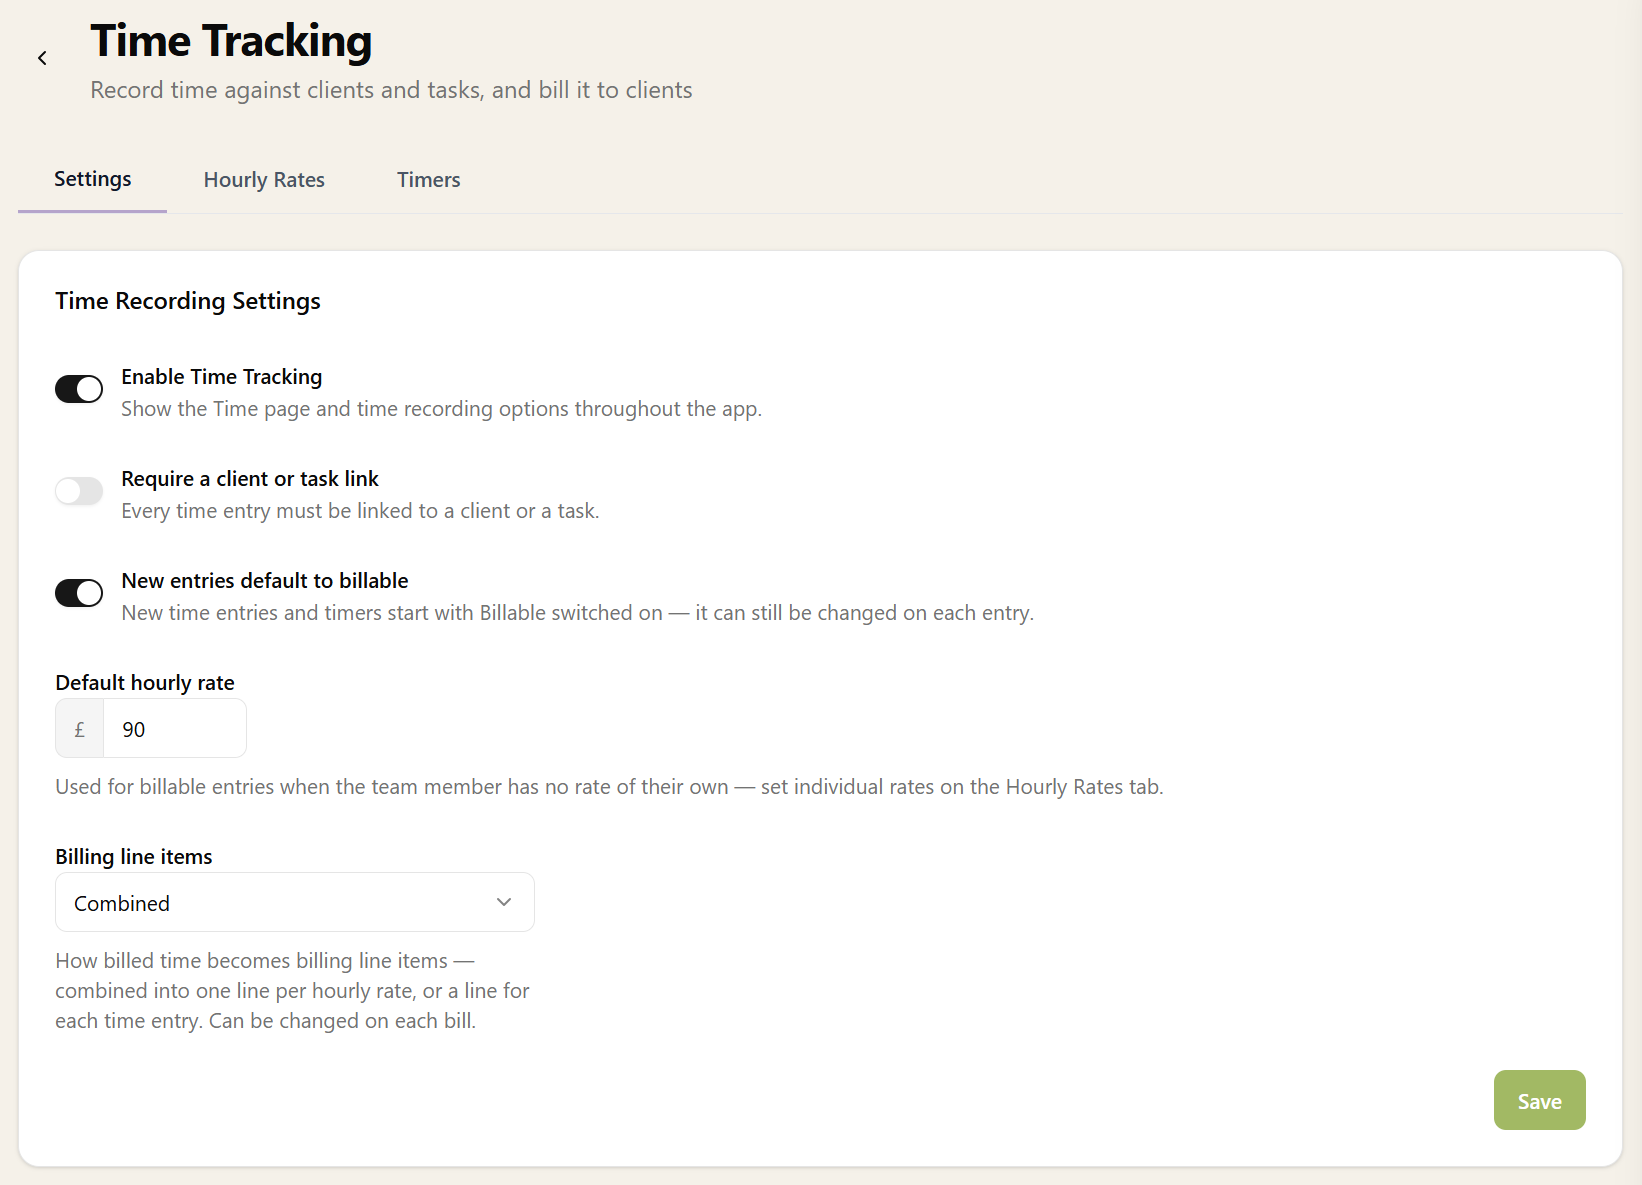
Go to Settings → Time Tracking and switch on Enable Time Tracking. This adds the Time page to your main navigation, a Time tab to every client and task, a timer button in the top bar, and hourly rate fields on team members.
Then set your defaults on the same page:
- Require a client or task link — when on, every time entry must be linked to a client or a task.
- New entries default to billable — new time entries and timers start with Billable switched on. It can still be changed on each entry.
- Automatic timers from task progress — starting a workflow step (or a task with no workflow) starts a timer on it, and completing it logs the time. Covered in its own section below.
- Default hourly rate — the charge-out rate used for billable time when the team member doesn't have a rate of their own.
- Billing line items — how billed time is grouped into invoice lines: one combined line per hourly rate, one line per entry, or a single line regardless of rate. You can override this each time you bill.
2Set rates for your team
Billable time needs a rate behind it. Still in Settings → Time Tracking, open the Team Members tab and click a person to set their Hourly rate — what their time is charged to a client at. Leave it blank and they use the practice default from the previous step.
The same editor holds a Cost rate: what an hour of their time costs the practice. You don't need one to bill time, but it's what the Cost & Profit report and paying people for their time are built on, so it's worth filling in while you're here.
When a billable entry is saved, Sodium resolves the charge rate in this order:
- A rate typed on the entry itself, if any.
- The team member's rate for the task category or service the time is for.
- The practice's rate for that task category or service.
- The team member's hourly rate on the date of the entry.
- The practice's default hourly rate.
Rates for a task category or service are optional, and set on the Rates by Work tab. Use them for work that is charged or paid differently from the rest.
3Log your first entry
Open the Time page and click Log Time. An entry is made of one or more time blocks. For each block, either enter a start and end time and let Sodium work out the duration, or flick Specify manually and type hours and minutes directly. Click Add block to record split sessions — a morning stint and an afternoon stint on the same job stay together as one entry.
Then fill in the rest:
- Description — what the time was spent on.
- Team member — who did the work (defaults to you).
- Client and Task — optional links. Choosing a client narrows the task list to that client's tasks.
- Workflow step — if the chosen task has a workflow, you can pin the time to a specific step, so reports show the 45 minutes went on "Reconcile bank transactions", not just the task.
- Service — if you don't work task-first, switch the picker from Link to Task to Link to Service and attribute the time straight to one of that client's services instead. It's one or the other, never both — a task already knows which service it belongs to, and letting an entry name a different one would make the Service Time report disagree with itself. Pick a client first; the service list is that client's own.
- Billable and Hourly rate — whether the time can be billed, and at what rate. The rate field shows the resolved default, so you only type here to override it.
You can also log time from a client's or task's Time tab — the entry arrives pre-linked to that record. If your Outlook or Google calendar shows on the task calendar, click a meeting and choose Log time: the entry opens with the meeting's date, times and description already filled in.
4Work with the Time page
The Time page opens on your own time for the current week. Use the arrows to step back and forward, and the Day / Week / Month toggle to change the size of the step. On these ranges entries are grouped under day headings with a total against each day and a total for the whole period — this is the view to check your week against before you bill it.
Pick a longer range (This quarter, This year, Any time) and the page switches to a sortable, paged table instead — click a column heading to sort. Alongside the range, two dropdowns narrow what you see: billing state (billable, unbilled, billed, non-billable) and team member. Your range, filters and column layout are remembered for next time.
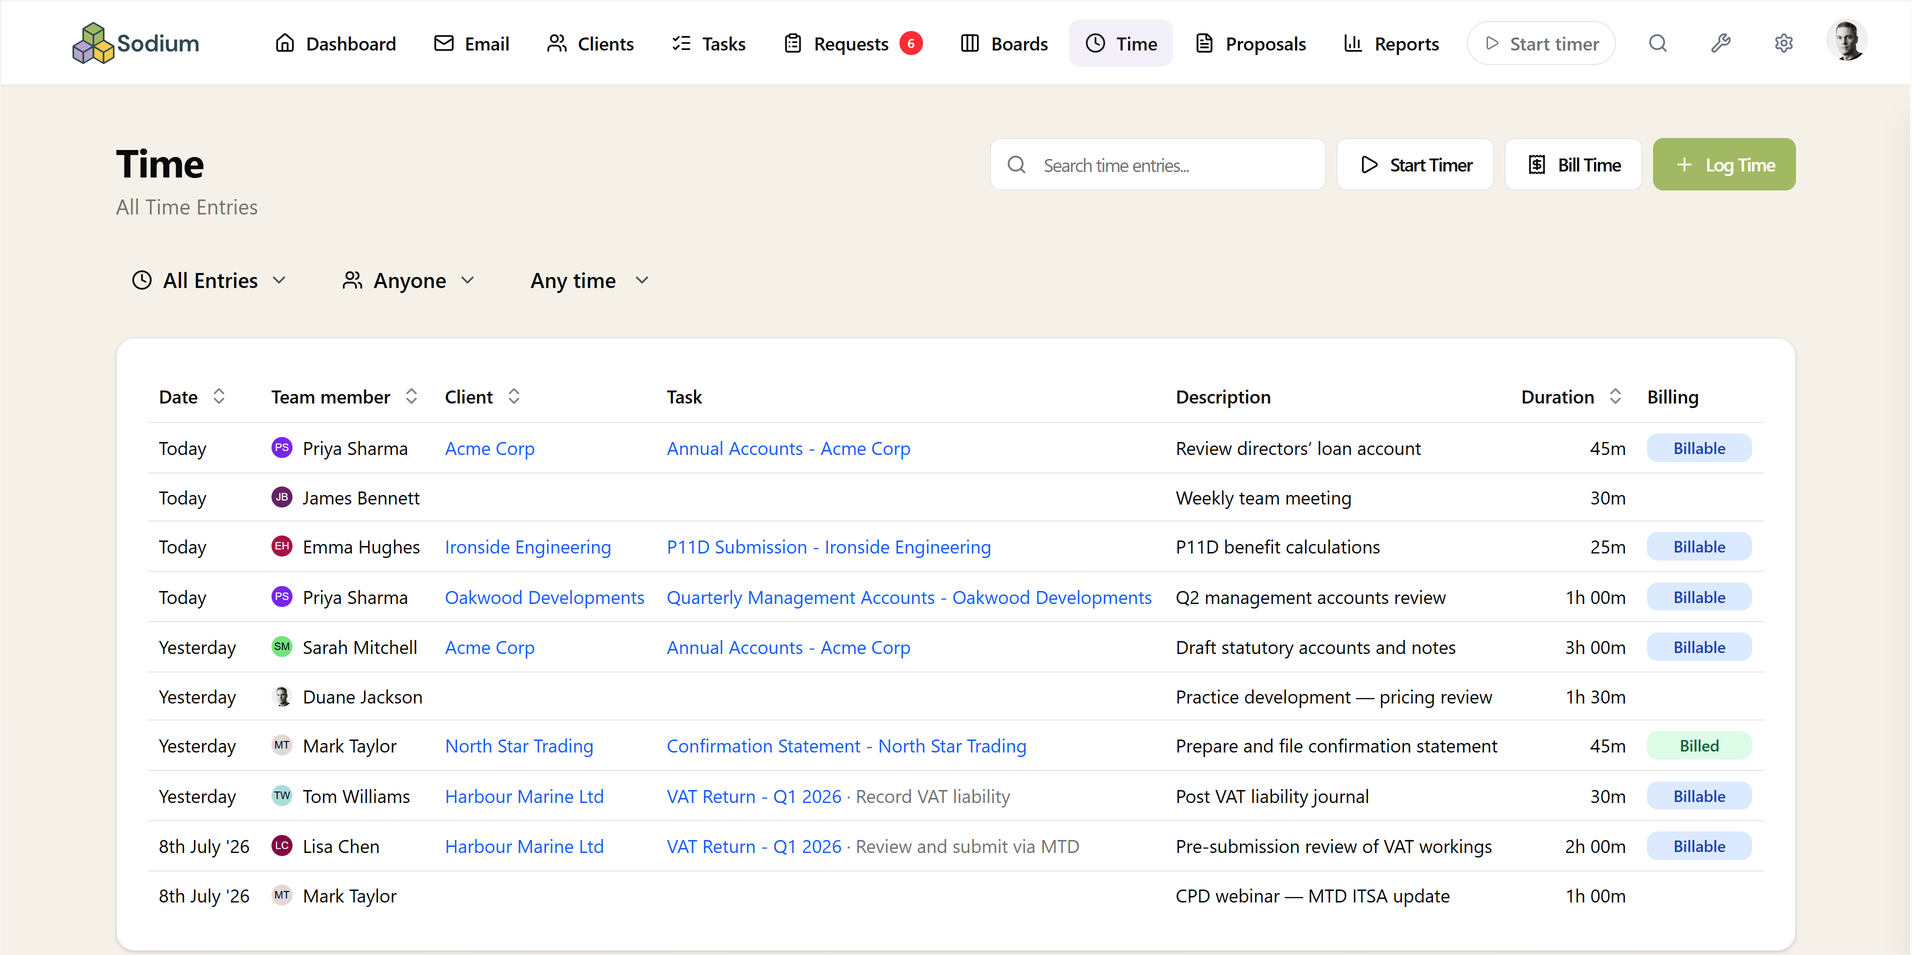
Choose your columns. Click the cog in the top-right of the table to pick which columns appear, drag them into the order you want, rename a heading, hide columns on small screens, or run the table full width. By default a single Entry column carries the description with the client, task and step beneath it — if you'd rather have Client, Task and Description as separate columns, switch them on here. This is your own layout; it doesn't change anyone else's.
Fix a time without opening it. Click into the start, end or duration in the table and type over it — the duration accepts "1:30", "90" and "1h 30m". Press Enter or click away to save, or Esc to abandon the change. Editing the duration of a timed entry keeps the start where it is and moves the end.
Entries made of several blocks — anything from a timer you paused — show their block count instead, and entries that have been billed or written off lock their time. Both open in the full dialog when you click the row, which is also where you go to change the client, task, description or rate.
Hover a row and a menu appears at the end of it: Continue as timer starts a fresh timer linked to the same work, Duplicate copies the entry to today, Write off settles it without a bill (see below), and Delete removes it.
5See your week as a calendar
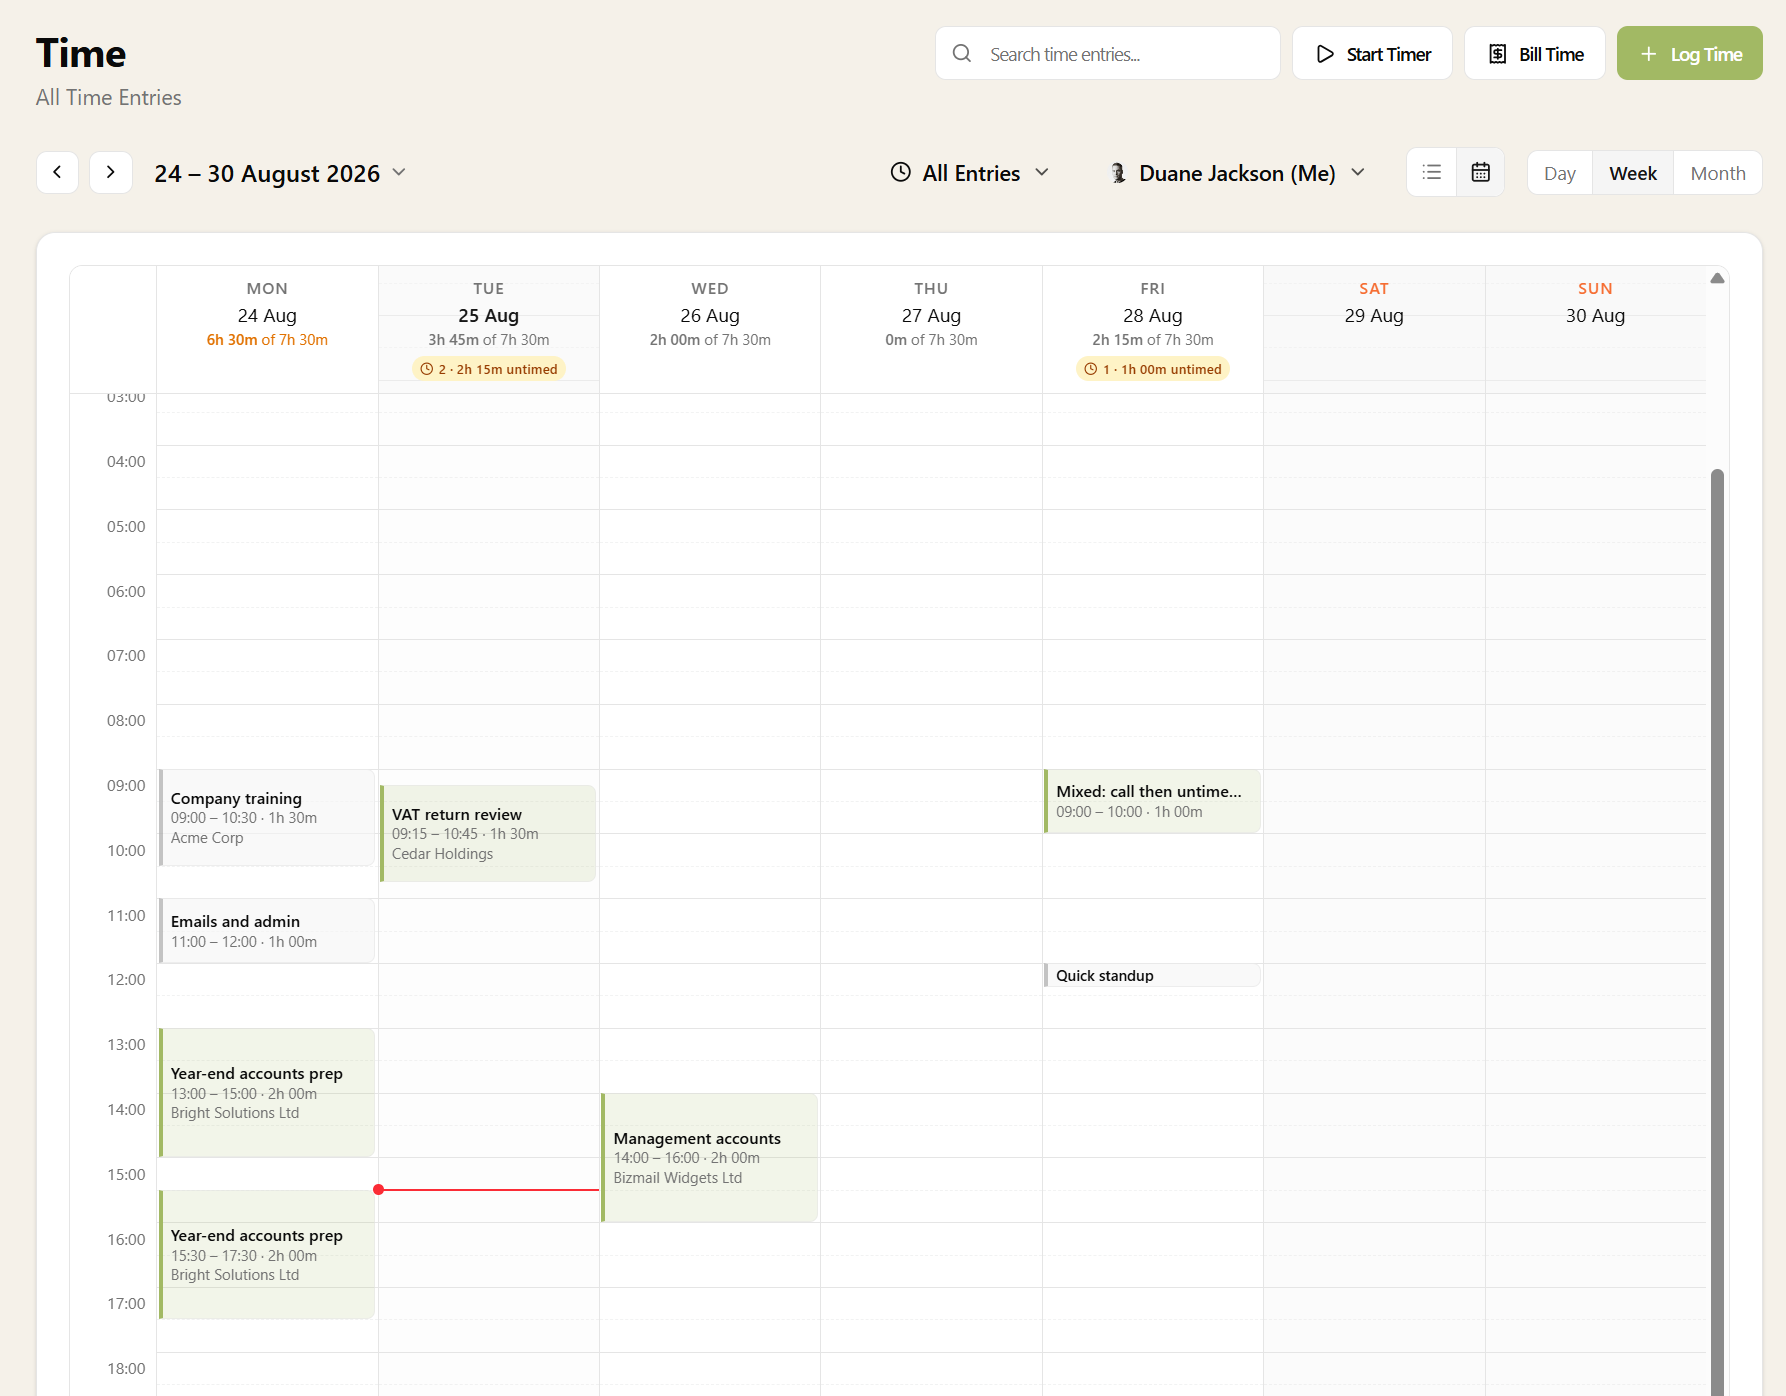
Next to the filters sits a list / calendar toggle. On the Day and Week ranges it turns the Time page into a calendar: every stretch of work is drawn to scale at the time it happened, so a gap on the grid is unlogged time you can see at a glance. An entry built from a paused timer shows each session separately — the pause stays visible rather than being flattened into one solid block. Longer ranges keep the table.
When the view is filtered to one person, their working pattern is drawn in: each day's header shows hours logged against hours expected, a completed day that fell well short turns amber, and days they don't work are shaded out like weekends.
Entries logged as a bare duration have no start time, so they can't sit on the grid — instead an amber banner at the top of their day counts them and their hours. Click it to list them, and click one to give it a start time and a place on the calendar.
The calendar edits by touch, snapping to 15 minutes: drag an entry to move it to another time or another day, drag its bottom edge to change the end time, and click one to open it in full. Click an empty slot and a new entry opens starting there — pre-filled to the end of the gap when your next entry is close by, or an hour when the day is open — or drag across an empty stretch to take exactly the span you drew. The quickest way to fill the holes in your day.
6Use the timer
For work you're about to do (rather than time you're writing up afterwards), start a timer instead. Click Start Timer on the Time page, on a client's or task's Time tab, or in the focus panel while working a task — the timer starts already linked to whatever you started it from, down to the workflow step.
While a timer runs, a pulsing green pill shows in the top bar wherever you are in the app. Click it to open the timer: you can toggle Billable, pause and resume, discard, or finish. Each stretch of work between pauses is recorded as its own time block, so a lunch break never inflates the hours.
When you're done, click Stop & Log. The entry dialog opens pre-filled with the elapsed time, blocks, and links — check the description and save.
To go back to something you worked on earlier, click the arrow beside Start timer in the top bar. The menu lists your recent work grouped by day, under a Logged today bar that compares the time you've recorded today with your working pattern. Click the play button on any row to start a timer with the same client, task, step and description. If the entry is from today, stopping the timer adds the new time to that entry as another block; anything older starts a new entry for today.
7Let timers run themselves
If your team already works through tasks and workflow steps in Sodium, you can stop starting timers by hand. Switch on Automatic timers from task progress and:
- Setting a workflow step to In Progress starts a timer for you, linked to that task and step.
- Completing (or skipping) the step stops the timer and logs the time as a normal entry.
- Starting a different step while a timer is running logs the running timer first, then starts a fresh one — so moving between jobs never loses or double-counts time.
- Tasks without a workflow behave the same way, driven by the task's own status.
Auto-logged entries are ordinary time entries — linked, editable, and billable like anything logged by hand. A timer with under a minute on the clock is quietly discarded rather than logged, so flicking through steps doesn't litter your Time page.
8Bill unbilled time
When it's time to invoice, click Unbilled Time on the Time page. It opens your whole work-in-progress position: every client with billable time waiting, how many hours, what it's worth, how old the oldest entry is, and the totals across the practice.
Narrow it before you start. Set a date window — Up to end of last month is the usual month-end cut-off — and the whole page reflects it, so a billing run never sweeps in work that's still in progress. You can also filter to one team member, and sort by value, hours, age or name to decide what to bill first.
Pick a client and their entries open beside the list, grouped by day and totalled at the foot of the column. Every billable entry starts ticked; untick anything you'd rather hold back. Clicking a row opens that entry if it needs correcting first.
Choose how the lines are shaped with Line items:
- Combined — one line per hourly rate, e.g. "9.5 hours at £120". Compact invoices.
- One line per entry — each entry becomes its own line, using the entry's description. Full transparency for clients who want the detail.
- Single line — everything on one line at the total amount, whatever the rates behind it. The usual choice for a fixed fee.
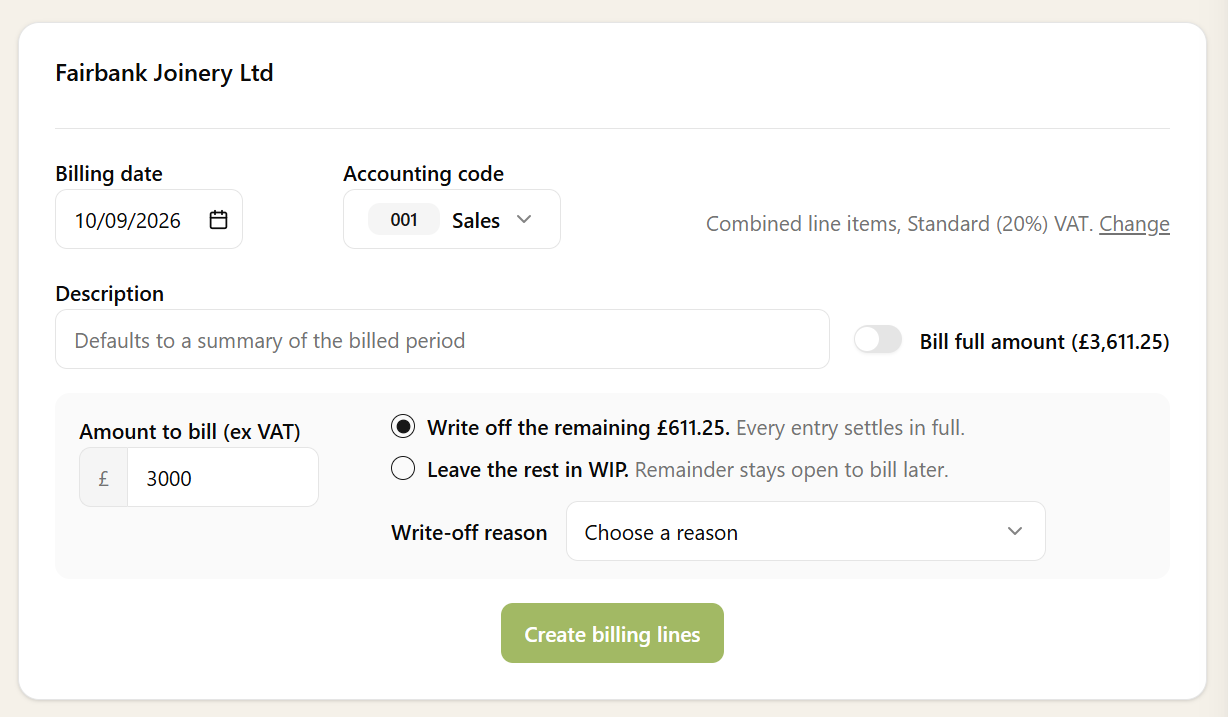
The Fee box starts at what the ticked entries are worth — hours times rate — and left alone, that is what gets billed. Most quoted work isn't billed by the hour, though, so type the fee you actually agreed and the panel shows the difference straight away:
- A fee below the time — choose Write off the remainder to settle every entry in full and record the shortfall as a write-off, or Leave the rest in WIP to settle only what the fee covers and keep the balance open to bill later. Writing off needs a reason.
- A fee above the time — the difference is recorded as a write-on, also with a reason.
A table underneath shows how the fee lands on each entry — what was open, what is billed, what is written off — so there are no surprises on the reports afterwards. A fee of zero bills nothing; to dispose of time without charging for it, write it off from the entry instead.
Set the VAT rate, Billing date (today unless you change it), and Accounting code (it defaults from your billing settings). A preview shows the exact lines that will be created — description, amount, billing date and status — laid out the way they'll appear on the client's Billing tab, under Billing Line Items. Confirm, and they follow your normal client billing pipeline onto the next invoice. The client drops off the list and you move to the next one.
To clear several at once, tick them in the list and choose Bill N clients. The run uses one set of choices for all of them, but each client is billed at its own VAT treatment, so a mix of UK and outside-the-scope clients still invoices correctly — there's no VAT rate to pick. Clients are billed independently and you get a result for each, so if one fails the rest still go through.
An entry with no hourly rate can't be billed, and is shown flagged rather than quietly dropped. The rate is worked out when the entry is logged (from the entry, the rates for its type of work, the team member, then your practice default), so a blank one means none of those was set at the time. Click the row to give it a rate and it joins the next run.
Billed entries lock their time, rate, billability and client, and can't be deleted; the description, task and step stay editable. An entry billed in part shows as Part-settled with the balance still open, and stays in the unbilled list until it's cleared. If you delete the billing line before it's invoiced, the entries unlock and return to the unbilled pool.
9Write off time you won't bill
Some time is never going to be charged: a trainee's first attempt, a goodwill fix, an hour spent on a query that was really the client's fault but not worth the argument. Leaving it in the unbilled list means it inflates your WIP and gets in the way of every billing run. Writing it off settles it with no bill raised — the client isn't charged, the entry locks, and the amount is recorded against a reason.
Hover the entry on the Time page (or the client's Time tab) and choose Write off from the menu at the end of the row. The dialog starts at everything still open on the entry; enter a smaller amount to write off part of it and leave the rest to bill. Pick a Reason, add a note if the reason alone won't make sense in six months, and confirm.
Six reasons are set up for you — Quoted fixed fee, Overrun, Goodwill, Client dispute, Training / junior time, Other — and they're what the Write-off Analysis report groups by, so it's worth picking the honest one rather than the nearest one. The WIP Value report shows what's still open, how old it is, and how much of each client's time has been recovered so far.
10Compare estimates with actual time
Estimates live on the work itself. Give each step of a workflow a time estimate and every task using that workflow gets its budget automatically — the sum of the steps that apply to that client. Tasks without a workflow take a Time Estimate directly; set it once on the recurring task and every task it creates inherits it.
Once your team has been logging time for a while, open the Service Time report to see estimated versus actual hours per service. Drill into a service for its clients, a client for its tasks, and a task for its workflow steps, or group by team member to see who logged the time against whose estimate. This is where underpriced work shows up: if Bookkeeping is budgeted at two hours but one client consistently takes six, you have the recorded evidence for a repricing conversation.
Set what each person is expected to log
If you want to measure logged hours against a number you expected, set up working patterns: the hours due on each day of the week, saved under a name like Full time or Part time (Mon/Wed/Fri).
This is entirely optional. Skip it and the Team Time report still shows you what everyone logged — there's just nothing to compare it against.
Create your full-time week first. Sodium prefills 7.5 hours Monday to Friday, so for most practices it's a name and a save. The first pattern you create becomes the practice default automatically, and every team member is measured against it unless you say otherwise — which means you can stop here and the Team Time report already works.
Add further patterns only for the people who differ.
Check everyone is logging their hours
The Team Time report puts the whole team on one screen: hours logged over a period against the hours their working pattern expected, with the variance beside it. It answers the weekly question — is everyone hitting their hours? — without opening a single timesheet.
Reach for Last week as your date range. A completed Monday-to-Sunday week is what a weekly review actually wants, and it avoids reading anything into a period that hasn't finished. If you do check mid-week, expected hours are counted only up to today, so the numbers stay honest rather than showing everyone behind.
Two things are worth looking for. Someone at zero — they still get a row, and on a short period the day-by-day strip beside their name shows exactly which days are empty, which is how a few days off surfaces before anyone mentions it. And someone well over — steady overtime nobody asked about is as worth a conversation as the gaps.
Keep an eye on running timers
Admins get a third tab in the time tracking settings: Timers. It lists every timer currently running across the practice — who started it, what it's linked to, how long it's been going, and whether it's paused.
Spot a timer someone left running overnight? Pause it — that stops the clock without losing the time they genuinely worked. Discarding is also available, but that throws the accrued time away, so pausing is almost always the kinder fix.
Restrict someone to their own time
By default everyone with access to time tracking can see the whole practice's time. If that isn't right for a contractor, a junior, or an outsourced bookkeeper, switch on Own time only against their name on the Team Members tab. You can also set it on the person's record under Users and Teams.
With it on, that person:
- Sees only their own entries on the Time page, on client Time tabs and on task Time tabs — the team member filter and column disappear.
- Can only log and edit time for themselves; the team member field on the entry dialog is locked to them.
- Can't bill time to clients — the Unbilled Time page is out of reach.
- Can't open the Service Time, Team Time or Cost & Profit reports, which report across the whole practice.
- Can't see the cost side at all — Unpaid Time and cost rates are closed to them whatever permissions they hold.
Everything else they can do is unchanged, and turning the switch back off restores the full view immediately. Their time is still visible to everyone else throughout — this restricts what they see, not what they contribute.
Tips for getting the most out of time tracking
- Start timers from the work, not the Time page. Starting from a task's Time tab or the focus panel links the timer automatically — no filling in client and task afterwards.
- Pause instead of discarding. Paused time keeps everything you've accrued; discarding destroys it. If you're interrupted, pause.
- Link to workflow steps for granularity. Task-level time tells you a VAT return took three hours; step-level time tells you two of them went on chasing records.
- Check the week before you bill it. Step the Time page back a week with the team member filter on Anyone — the daily totals make a missing afternoon or a duplicated entry obvious, and you can correct the times in the table without opening anything.
- Match the line mode to the client. Combined lines keep invoices tidy for most clients; switch to one line per entry for clients who query every invoice.
- Set estimates even if you're guessing. Rough estimates on your workflow steps and recurring tasks make the Service Time report useful from day one — you can refine the numbers as real data comes in.
- Let automatic timers do the recording. If your team works through workflow steps anyway, switching on automatic timers captures the time as a by-product — no end-of-day write-ups.
Where to go next
- Time Tracking feature page — the full feature overview
- Setting Up Client Billing — where billed time goes next
- Setting Charge-out and Cost Rates — rates that change over time, and who can see cost
- Paying Your Team for Tracked Time — the cost side: approving time and recording pay runs
- Services & Pricing — the services your time rolls up to
- Workflows — the steps your time entries link to, and where step time estimates live
Questions about tracking or billing time? Get in touch and we'll walk you through it.