Setting Up Client Billing
This guide walks you through enabling recurring client billing in Sodium — from connecting your accounting platform to seeing your first invoices land automatically. Most firms can be up and running in under ten minutes.
Before you start
Client billing generates invoices in your accounting platform, so you'll need two things in place first:
- A connected accounting platform (Xero, QuickBooks, FreeAgent, or Sage).
- Your clients mapped to their corresponding customer records in the accounting platform. If you imported clients from the platform, this is already done.
1Enable client billing
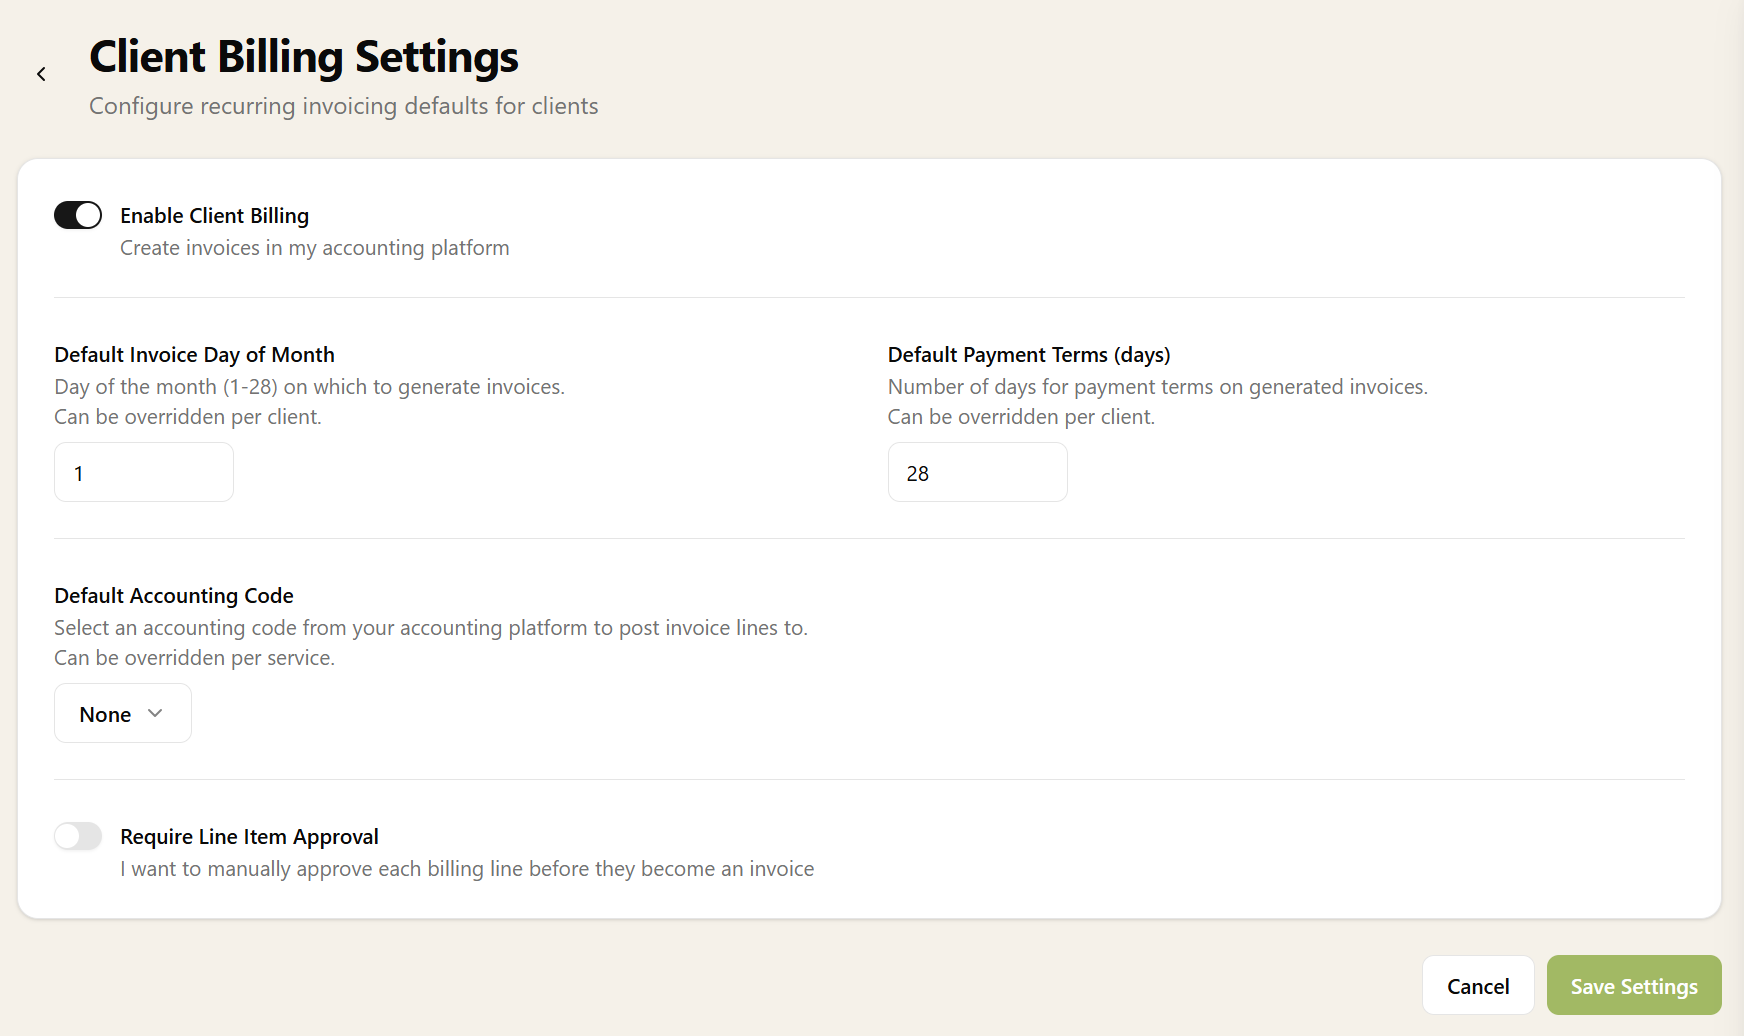
Go to Settings → Client Billing and switch on Enable Client Billing. This activates the billing pipeline and renames the Invoices tab on every client page to Billing.
While you're here, set your defaults:
- Invoice day of month — the day (1–28) that invoices should be dated. Most firms use the 1st. This can be overridden per client later.
- Payment terms — how many days clients have to pay (e.g. 28). Also overridable per client.
- Require line item approval — if switched on, generated line items are held as "Pending" for you to review before they become invoices. If switched off, they're approved automatically. Start with approval on if you want to check things the first few times, then turn it off once you're confident.
- Default accounting code — the nominal code from your accounting platform that invoice lines should be posted to. Individual services can override this with their own code.
Save your settings.
2Set up accounting codes on your services
Edit each service you want to bill for. On the service form you'll find:
- Accounting code — the nominal code specific to this service. If left blank, the default from your billing settings is used.
- VAT rate — Standard, Reduced, Zero, Exempt, or Out of Scope. This is included on every invoice line.
- Invoice line description template — a template like
{{ ServiceName }} - {{ Month }} {{ Year }}that produces descriptions like "Bookkeeping - June 2026" on your invoices. If you leave it blank, the service name is used.
3Enable billing on existing client services
For each existing client, go to their service list and switch on auto-invoicing for the services you want to bill automatically. When you enable billing on a service, Sodium sets the next billing date based on the service start date and billing frequency.
If you have a lot of services to switch on, this is much faster to do in bulk via a CSV — see our updating services via CSV guide.
Any new services added to a client after you turned Client Billing on will default to auto-bill, so you only need to do this sweep once for the back catalogue.
You can tell at a glance which services are billing automatically. Next to each service price you'll see a small pound icon:
- auto-billing is on.
- auto-billing is off.
That's the setup done. From here, the pipeline runs itself.
4Overriding defaults for individual clients
Any of the defaults from step 1 can be overridden on a per-client basis.
Open a client and go to their Billing tab. You'll see a cog icon () — click it to override any of the defaults just for this client:
- Invoice day of month — bill this client on a different day to your default.
- Payment terms — give this client a different number of days to pay.
- Line item approval — require (or skip) approval just for this client's lines, regardless of the global setting.
5Review your first billing run
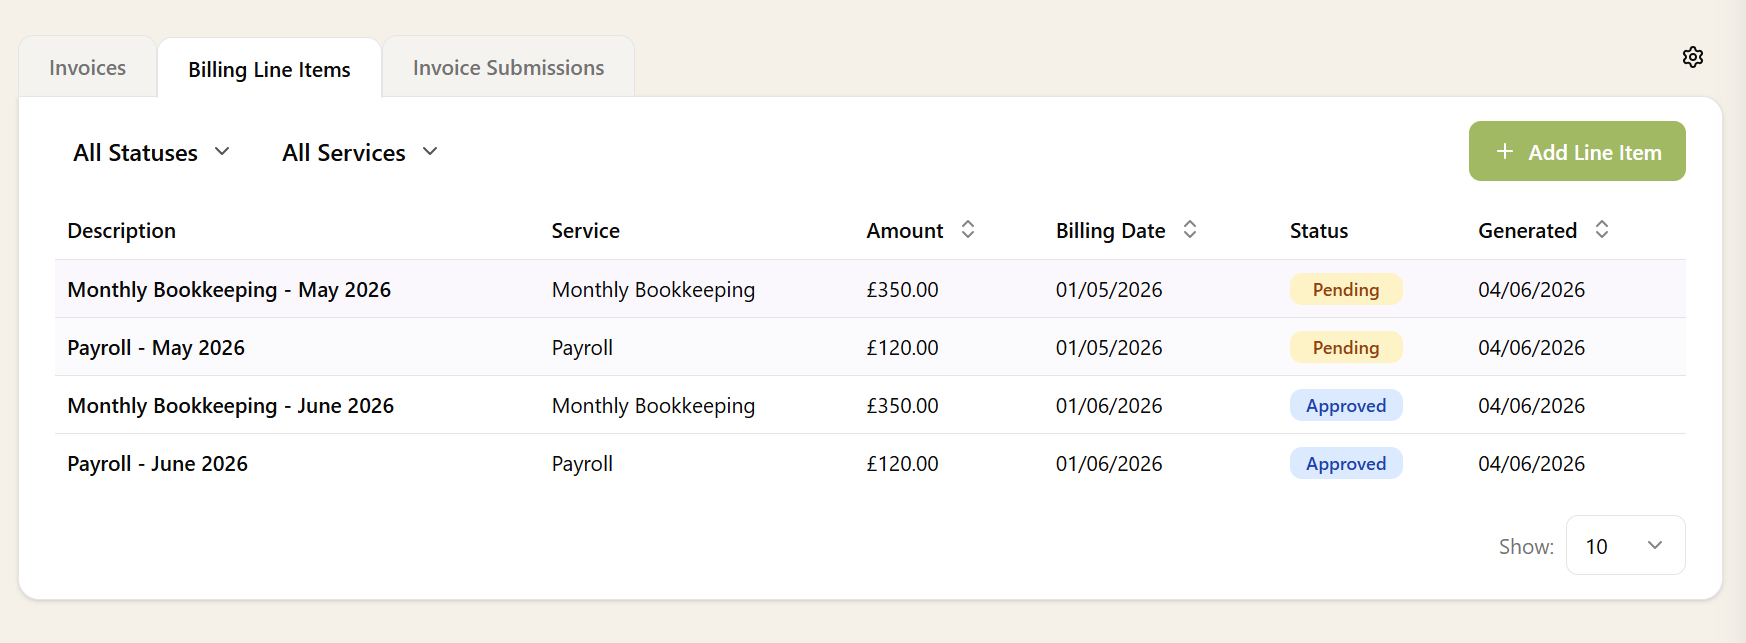
Sodium generates billing line items overnight. After the first run, open a client's Billing tab to see what was created.
Each line item shows the service name, period covered, unit price, VAT rate, and status:
- Pending — awaiting your approval (only if approval is required).
- Approved — ready to be invoiced in the next submission run.
- Invoiced — already pushed to your accounting platform.
- Cancelled — manually cancelled by you (e.g. a line you don't want to invoice).
If you have approval enabled, review the pending lines and approve them. They'll be picked up by the next invoice submission run.
6Watch invoices land in your accounting platform
The overnight process bundles approved line items by client and billing date, creates an invoice in your accounting platform, and records the result. Back on the client's Billing tab, each submission shows:
- The invoice number assigned by the platform
- A direct link to view the invoice in Xero, QuickBooks, etc.
- The total amount and number of line items
- The submission status (Submitted, Failed, or Projected)
You can also submit invoices manually for any client at any time — useful if you don't want to wait for the overnight run.
Adding a one-off billing line
Recurring services generate their lines automatically, but you'll occasionally need to bill for something not captured by the services recorded in Sodium. You can add these by hand without setting up a service for them.
Open the client's Billing tab and add a new line, setting the description, amount, accounting code, and VAT rate. The line you add behaves exactly like a generated one: it follows the same approval rules and is picked up by the next invoice submission run, so it lands on the client's next invoice automatically — there's nothing extra to submit.
What if something goes wrong?
If an invoice submission fails — for example a client isn't mapped in your accounting platform, or the platform returns an error — we'll send you an email letting you know. The submission is marked as Failed with the error message visible alongside it.
Fix the underlying issue, then retry the submission with one click. The line items are preserved and re-pushed.
Stuck on a failure? Get in touch — we're happy to help you work through it.
Tips for getting the most out of billing
- Start with approval on. Turn on line item approval for the first month so you can verify everything looks correct. Once you're happy, switch it off and let the automation handle it.
- Use description templates. A template like
{{ ServiceName }} - {{ Month }} {{ Year }}makes your invoices much clearer for clients than just the service name. - Check projected invoices. Before going live, use the projected submissions view on a few clients to verify prices, descriptions, and dates all look right.
- Combine with Direct Debit. If you use Adfin or GoCardless, client billing creates the invoices and your Direct Debit provider collects the payment — a fully automated billing and collection pipeline.
- Use packages for bundled billing. If you sell service packages with a single package price, enable package-level pricing and your clients get one clean line item on their invoice rather than individual lines per service.
Where to go next
- Client Billing feature page — full details on the billing pipeline, submissions, and settings
- Services & Pricing — set up your service catalogue and pricing
- Accounting Software — connect Xero, QuickBooks, FreeAgent, or Sage
- Direct Debit — automate fee collection alongside billing
Need help setting up billing for your practice? Get in touch and we'll walk you through it.